


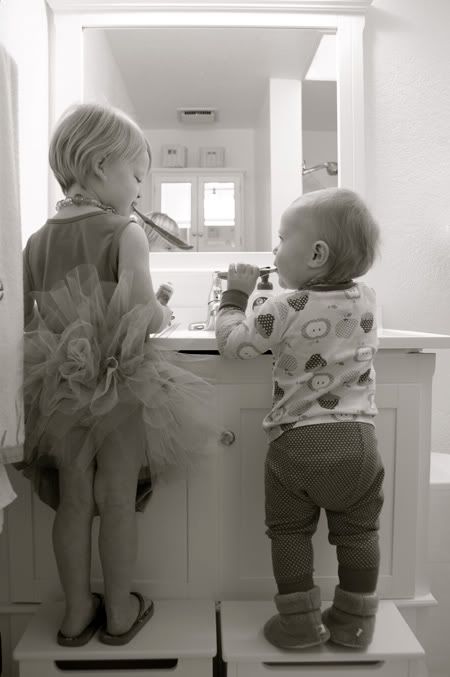
One thing I love about my job is how I fall in love with each of my clients. I met these two cuties a little over a year ago...and just love seeing them and their sweet mom.
What I especially love is when I receive pictures from clients with pictures of how children I've photographed have grown and the beautiful captures that are caught.
Secret: The cutie on the left is where I found my inspiration for my Cam's haircut. The haircut that I hear more compliments on and I have to always give credit to the real inspiration...the cutie sporting the tutu.
What I love about this picture is it's full of fabulous composition and is a great example of following rule of thirds. To read more on rule of thirds, scroll down a few posts.
 Now...there was reason behind the random titled blog post. The mother of these cute girls took one of my first "Getting to Know Your Camera" class.
 The "meat and potatos" of this class is learning how to understand how Aperture, Shutter Speed and ISO work and relate while using these concepts in manual settings...
Me...I like to shoot wide open but it's not always realistic when the child is nicknamed "Speedy". Then I will close down my aperture to maybe a f2.8 or f3.2, allowing more forgiveness for movement and not loosing all clarity.P mode- Program
A/Av mode- Aperture Priority
S/Tv mode- Shutter Priority
M mode- Manual
Ultimately, the best way to learning how these concepts relate is practice using them in manual mode. Meaning, just playing around to understand what happens when you shoot with a shallow depth of field and a fast or slow shutter.
The beauty of the digital camera is you can shoot crazy amounts of frames and not be out a dime from film lost. Back in my film, 35mm days, not that I really knew anything...I literally would go out with a pad of paper and write down the settings for each frame and then run to the nearest one hour developer... and try to learn from there. But honestly, I knew NOTHING!
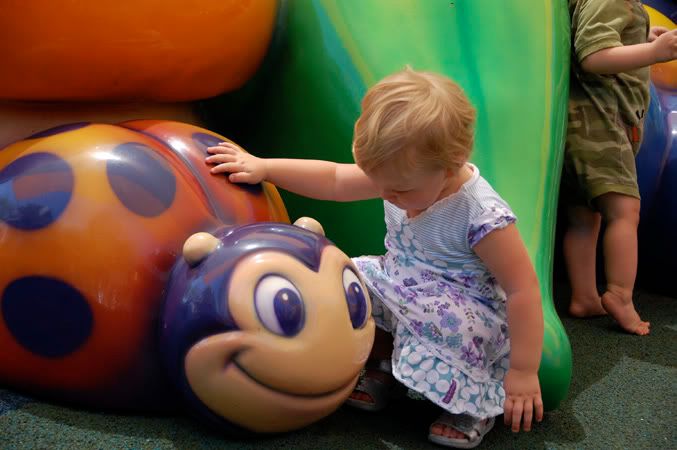
Anyhoo, my client recently sent in this picture with a very sweet email to brighten up my gloomy day. How sweet is that!
One thing she did include was that she was at a playplace playing around with her settings when she decided it would be easier to switch to A/Av, aperture priority mode.
Yeah...I was excited for her. Excited for not just switching to green mode but still being open to learning by shooting in Av mode. Honestly, aperture priority is a great place to start. Why? Well, your aperture/f-stop/depth of field is what gives the creative element to a picture.
How you ask? Well, your aperture determines how blurred your background is. Which ultimately is what everyone wants. How the blurred background adds to a fabulous picture is it blurs out the unimportant details in the frame to allow full attention to the focus of the picture.
Many of my clients that try to get that blur get frustrated as there is detail still included and not blurred as much as they'd like. Now, here is where I'm going to get lazy in my explanation...
basically it depends on your lens, along with the focal distance of your the background from the focal point in your frame. You really can't get that nice blur or bokeh... without opening your aperture wide open , achieved with a prime or fixed lens. Nice apertures typically range from f1.2 -2.8, depending on your lens. The lenses that come with cameras are considered kit lenses and limit you. The widest aperture is often f3.5 or f4, again depending on the lens and this aperture is only available when your lens is zoomed completely out.
Meaning, a 18-55 mm lens will probably have an aperture of f3.5-5.6. So, you can open up your aperture to f3.5 at 18mm and f5.6 is the widest available at 55mm. In order to open your aperture to f1.4 or 2.8, you would need a higher quality lens. Prime/fixed lenses are best for this. Why? Because they are available at a low cost while offering superior quality in clarity and shoot fast in low light. A lens with an aperture of f1.2 is super fast in low light.
(negative side not: not all Nikon cameras are compatible with prime lenses! be sure to research lens compatibility first!)
95% if the time I shoot with prime lenses, 35mm f2 (have a secret crush for the f 1.8), 50mm f1.4 and the 85mm f1.4. I do have the 17-55 mm f2.8, but it doesn't get much play as it doesn't offer near the quality of my primes and struggles in low light. The funny part is, it's the big lens. When I bring it out, that's when I see eyes pop as it's big. Then I often hear, "Oh, that must be your best lens." To which I reply, " Not really! It's good for that wide angle feel but my fav is hands down my prime lens....the less impressive looking small lens."
One thing to learn about getting sharp pictures is knowing your aperture and choosing the best for the subject being shot. Now...here is where my english turns japanese, or any foreign language, that means nothing without a translator. The more shallow your depth of field, the more room for error in clarity and/or selected focal point accuracy.
When I saw the picture below, I giggled! It's adorable! And the composition takes this picture to the next level...the level of printing, framing, and/or scrapbooking. Not the level of just thinking it's cute, can't delete but limited to never leaving a CD or DVD along with oodles of other pictures that never see the light of day.
One thing I did notice is where the clarity landed, and how it most likely fell off where the person photographing had the focal point selected.
The focus fell on the little girl's hand. Why, well...I'm sure the photographer told the camera to focus on the little girl's head but that's not where it landed.
Why? Simple...children move! The child moved off that focal point and the focal plane stayed but the child didn't! Rare right...HA...NOT! That's children. BUT...she is still in the focus range, not perfectly sharp but in the focus range. Which tells me she shot at a more realistic aperture for keeping details of the little girl in focus.
Okay...now I think I actually hear crickets chirping! Is anyone still reading? If not, I don't blame you! I just went total dorky, bookworm on you! But, I did try to not be too technical. Which leads me to...there are photographers out there that might be reading this totally laughing at my description but...I tried. There is a TON that goes into aperture but for me it's best if I cover this in person with hands on practice. So, I'm going to stop here.
Remember this...if it takes a while to grasp clarity in your pictures and getting them to where you are proud of them...BE PATIENT! Learning photography takes time. It DOES NOT happen over night. It's not learned/solved in a Q&A process. It's a journey. It's a journey of soul searching and math put together.
It's a journey that takes you to the level of appreciating life and learning how to better capture the details that make life memorable. Always remember, shoot what you like and be proud of it. Most importantly, show it off!
And...if you need translation for this wacked out post....let me know! Email me through the contact page of my website.


5 comments:
I'm bookmarking this post, Tami! It's a great tutorial! I was a bit frustrated Thursday when shooting a book that I made for a new post on my blog...I just couldn't seem to get my aperture any lower than 5 or 4.5. I noticed that when I 'backed up' with my focusing from the subject, I was able to lower my aperture, but not as low as I wanted...I think you just explained this in your post!!! I adore that I can take 250 in one 'shoot' (which I did!) and there's no expense - as well as immediate gratification or disappointment, as the case might be. I was disappointed in my shot as they seem to dark for my lighting, but that's how they turned out. I am still learning, glasshopper! Funny thing, it dawned on me MUCH later that I never once shot my book in 'green' mode...it never even entered my mind!!! Can you believe that? I can't!! I am determined to learn my camera!! Hoping your days are a bit sunnier - I am saying a prayer for peace and calm and sending you a hug!
xo
Carol D.
Awesome job; perfectly explained! Love your work and your fun, simple tutorials!
Ya gotta love brushing teeth in a tutu :) Cute pictures! LYG, N
Thank you for this! I love that you're willing to take the time to share your knowledge. Awesome~!
Just stumbled across your blog through Facebook/Julie Doud/Jackie Lindfors! Thanks for the blog!! I am so going to try this in my "A" setting. I would love to learn more, just need to find time. Thanks for keeping the humor too! Always easier to read something that isn't a manual.
Post a Comment